
Wherein the author explains a quick and easy way to paint a classic Cadian tank scheme, and reviews two new (to me) products to make life easier.

A note from Charlie: We've mentioned long-time Bunker dweller Tom a bunch of times, but this is his first post as a fully-fledged author, ushering in a new era in which we collar more of our friends to join us at the coal face of the content mines for the benefit of strangers on the internet. Congratulations?
Nobody ever asks me, “Hey Tom, how do you paint those models so nicely?” But if they did my answer would be, “with as little effort as possible!” I am a slow painter, and for me the challenge is always working out schemes to get the most bang for my buck. Recently I turned my attention to a trilogy of Leman Russ battle tanks. I did a few things well, made a couple of mistakes, and learned a lot.
When I learned of the existence of the Colour Forge paints, third party undercoat rattle cans that allegedly colour match to GW base paints, my initial thought was to paint my tanks plain green. Charlie accused me of cowardice and challenged me to keep going with the classic Cadian beige-and-green scheme. In a fit of temporary insanity, I did.

The Method
The first step of every large paint job is working out what sub-assemblies to make. In this case I started with separate barrel ends and hull weapons, which can all be freely exchanged without glue or magnets. I also attached the radio vox with magnets; I do this wherever possible with anything with a long thin antenna so it gets knocked off rather than broken. Finally I decided to leave the fuel drum off the back as I knew painting under it would be difficult.
I wanted the main colour to be green, but with stripes of beige on the main hull. With that in mind the main body and turret were sprayed GW Zandri Dust, then given a drybrush of Terminatus Stone Dry. Sub assemblies were sprayed green using Colour Forge Governor Green, which is colour matched to GW’s Castellan Green.
 |
| If you're in the UK, you can order this from various suppliers. I got mine from Firestorm Games. |
I’ve tried a few different non-GW sprays over the years, and generally found them underwhelming (which is not to say GW’s sprays haven’t sometimes disappointed me too). Colour Forge seem to have produced something pretty awesome. The pressure and spread is good, and although I have found it comes out a bit thicker than most GW sprays, is shrinks down a fair bit when drying and the end result is almost as thin. Also the can is much bigger, 500ml rather than 400ml, whilst still being cheaper than GW sprays.
Colour wise, the match is good, but not perfect. The green is a little bit cooler with just a hint more blue. It’s close enough that if you put them next to each other and stood back at table distance you wouldn’t notice though, and after a bit of drybrushing and washing I honestly can’t find the bits that I touched up post-spray.

Now the fun begins! AK Camouflage Plastic Putty for Airbrush is not just for airbrushes! Don’t let those elitist bastards fool you, anyone can use it! It’s a little bit like blu-tac, but somehow both thinner and more dense. It is less sticky than blu-tac, preferring to stick to itself over other surfaces, and less elastic, so it tends to stay where it’s put. You certainly could use blu-tac for this, or any other putty of your choice, but this stuff is designed for specifically this use, shouldn’t take the underlying paint off or leave a residue, and can give really crisp edges.
To make these stripes I pulled out a chunk, rolled it into a sausage in my hands, then squished it flat by pinching it with my fingers. Carefully lay it over the tank, then work along the edges squishing it down flat and, ideally, thin. I used a small metal poking tool to jam it into any gaps I couldn’t get my fingers into. You can add more if you need to extend a stripe. Remember whatever you put putty onto stays beige, everything else will become green.
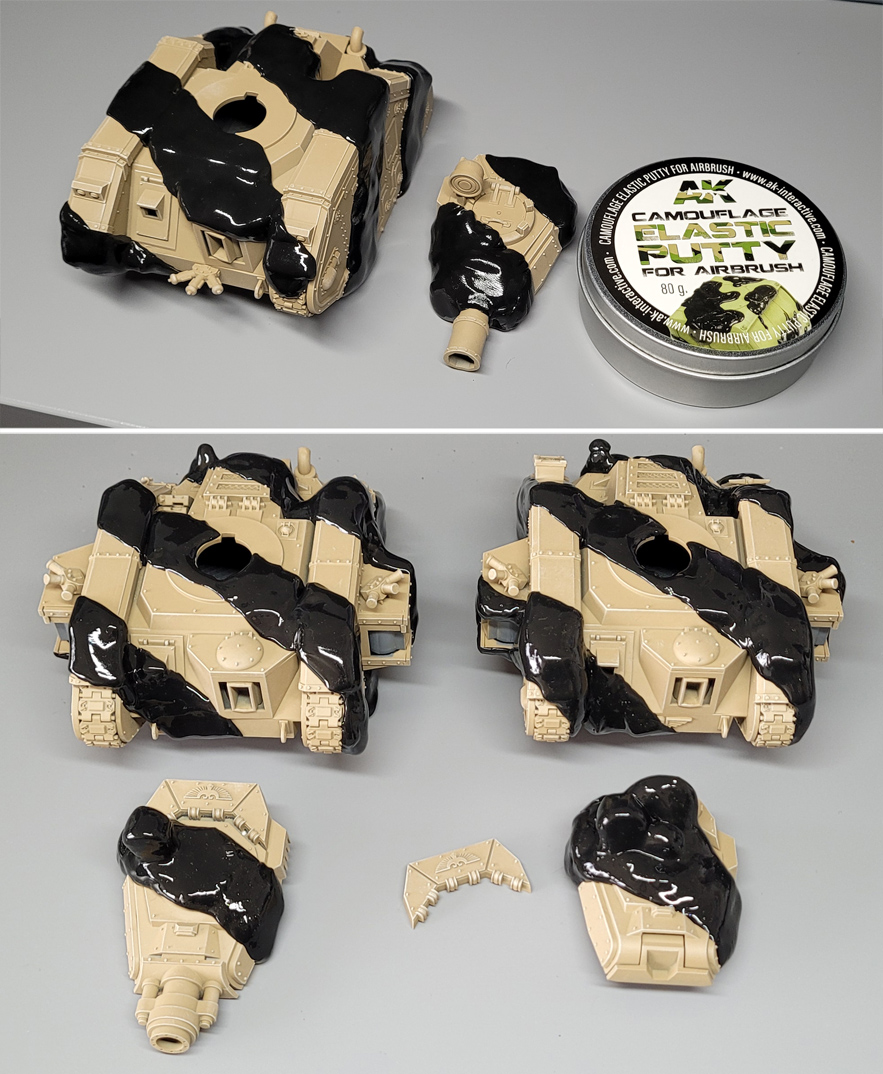
Now go forth and spray! I don’t know if it would happen with all paints, but I found after I left it to dry the putty oozed out of the stripes. I think this is the paint shrinking as it dried that causes it to burst out. It’s not really important, but is slightly annoying for this next step, because now, before removing the putty, you need to drybrush the tank Nurgling Green Dry. The putty means you can use a nice big brush and not worry about the beige stripes. Don’t forget the sub assemblies!

Next up is the peeling process. This is actually a bit more time consuming that you might think. Gravity and the pressure of contracting paint has now jammed this stuff deep into every crevice. Fortunately once you’ve got a bit of it off, you can use that to stick to the rest and yoink it out. Don’t worry about the paint, it’ll just mix in, the putty is fully reusable.
In a few places you might get a few flakes, just gently rub them with the back of your nail to flake them off.

Using a smaller drybrush, you can now carefully touch up the green areas that were hidden by the oozed putty.


You now have a mostly painted Leman Russ in classic Cadian camo. My next steps were to chip the paint (sponge on Nurgling Green/Screaming Skull, paint in Rhinox Hide leaving an outline of the sponged colour, then paint on Leadbelcher leaving an outline of Rhinox Hide), paint the metal bits and other details, wash the whole thing in Agrax Earthshade (for best results dilute about 1:1 with water, or something like Lahmian Medium if you’re posh, soak up any puddled as they form to avoid blotches and tidemarks), then liberally apply Typhus Corrosion to the tracks as mud.
 |
| Kasr Bastos |
 |
| Kasr Petros |
 |
| Kasr Derth |
Summary
- Undercoat in GW Zandri Dust
- Drybrush Terminatus Stone
- Apply putty stripes
- Spray Colour Forge Governor Green
- Drybrush Nurgling Green
- Remove putty
- Paint in details
- Apply wash and mud
Lessons Learned and Conclusion
Firstly, and most noticeably, the Agrax came out darker than I’d hoped on the first Russ. I don’t mind it too much, the tank looks nicely grimy, but I was using a new pot, my first time with the new mix, and despite doing a test piece it ended up being darker and blotchier than I had expected.
A wash on a flat surface like a tank is never a great idea, but I didn’t want to pin-wash every panel, and the rest of my army is all washed in Agrax, so it needed something to blend in. I bought into GW’s hype about their new wash formula and thought it would be ok. For the other tanks I was more careful and watered down the wash as I applied it, and took care to soak up any puddles on flat surfaces as soon as they formed, before they could dry. I did a few more extensive test pieces first (using pure wash, 1:1 Lahmian Medium, and 1:1 Contrast Medium), but just water worked fine.
Secondly, the putty got into the tracks. Irretrievably. Despite much effort with lumps of putty and pins. Not a huge issue, it’s lost under the mud now, but annoying. Given my laziness, next time I will leave the tracks off, spray them silver and glue them on just before the wash stage.
It was definitely a lot more effort than plain green tanks, but I think ultimately worth it. A lot more visually interesting than a plain green brick and all of that extra effort is just playing around with putty which is kind of fun and completely stress free (no need to be neat or worry about messing up existing paint).
Now, bring on the Dorn!
Dear Tom,
ReplyDeleteThanks for joining the publications, and congratulations on your creations!!
If there is something I like about your gaming club, is how you make clean finishes and "advanced" techniques easy and approachable, from a "from a time-starved gamer to another busy gamer" focus. And being very honest, open and forthright on the time it takes and why you settle in that particular tradeoff.
I think I will be buying some AK putty in the future. Their sprays are also very good, and having another source of reliable colour sprays and novel shortcuts to a good finish is great.
I also have settled on spray-can zenithals followed by drybrush and Contrast/Inks as a way to pass into the beloved "faux low Box-Artish" territory I need for happiness without spending obscene amounts of time on it.
Totally agree with you on the new GW shades - the hype was right. An absolute joy to use over metallic "LeadBelcher" basecoats and Contrast/Drybrush jobs for that clean, deep look. They really act as a recess-shade only, as they were always supposed to - "Agrax Earthshade" and "Tyran Blue" are really good.
Thanks, glad you enjoyed it.
Delete