I was discussing with Charlie what my next post should be about and I had expressed a wish to do some sort of step by step helpful instructional type post where I impart knowledge from my brain meats to yours. His response was pretty clear.
"Maisey," he said, "there is only one thing I can imagine you doing."
"Tanks?" I said.
"Tanks," he said.
So, I like tanks. They are fun to build, fun to paint and they make things go BOOM! Which is always satisfying. I have a few tanks. When I say a few I mean lots. Lots like fish in the sea lots.
In my last post I mentioned the urge to do a Chaos/Rebel Guard army. This going to let me have a lot of fun as both armies have the world of opportunity to convert everything, but I'll mostly focus on the tanks. The first tank I'm going to attempt is one from the Guard side of things and is going to be one of my all time favourites: the Demolisher.
 |
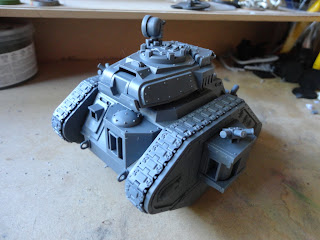
| So Fresh, So Clean... |
Here is it fresh off the production line. You'll notice that it's missing all the armaments. With the current kits you can easily swap the guns around if you're a little careful about it and with the use of some high-tech wizardry (blue-tack) you can have 60 different load-outs available to you (no really, I did the maths) and that's more choice than my simple brain can cope with.
 |
| There's Options! |
The next step was to have a good old rummage in my bits-box and pull out all the spikey bits and anything else vaguely chaos or useful. I wanted to make this tank a rolling temple of hate, and pointy things always mean hate (just look at those hateful wrought iron park fences).
 |
| More hate than a white picket fence... |
One thing I did find in my bits box was some Forge World tank commanders. These things are wonderfully sculpted models. The downside is that they are resin and need to be super glued into place. The practical slice of my brain had a reasonable fear of the bond breaking and the model falling into the turret, so I needed to add some bracing underneath to prevent it from dropping in. The most efficient method I found was a spare small square base glued in under him. This also filled in the gap between his legs and the turret.
 |
| Potential problem... |
 |
| ... and the solution! |
Here I have finished sticking pointy bits and skulls and chains onto everything that could conceivably have pointy bits and skulls and chains hanging on it without going too overboard. When adding things like this I always try and remember that this is still a working combat vehicle and the turret and sponsons need to turn and fire. Also engine hatches and crew hatches still need to be accessible. It's all well and good making the tank look like an evil pin cushion of doom but if the adornments would physically stop the turret from turning then it can break immersion. It turns it from being a believable vehicle into something illogical and confusing. I know this is all make believe but making something credible just adds to and strengthens the fantasy. These little details make all the difference when building a tank or any kind of conversion.
 |
| A pointy shine to the machine's engine daemon... |
Next up was battle damage. This is a fun stage where you can really go to town and make the tank as beaten and battered as you like, but always remember less is more. A few scrapes in the right place looks better than a completely ruined side panel (unless you're a Nurgle cultist, an Ork anything, or building a burnt-out wreck for scenery). I was sure to make the bullet holes look like a trail, as if someone sprayed the side of the tank in one direction as well as mixing up the size of the bullet holes (as the tank gets hit by small arms or a heavy bolter or an autocannon they will leave different sized holes).
As you can see below, I've tried to make each section of damage into a little vignette. Going clockwise from the top left: Attacking infantry have tried to shoot the crew hatch open to lob in a frag grenade. Desperate to slow the tank down troops have tried to focus fire onto the weaker armour around the engine block. The deep gouges along the side of sponson from where the tanks crew tried to force themselves down a narrow alleyway. Some sharpshooter has tried to pick off the tank's commander but only hit the turret.
Now the tank is ready for paint. However, I'll go through the details of painting this bad boy next time.
Until then, take it easy folks.


Comments
Post a Comment